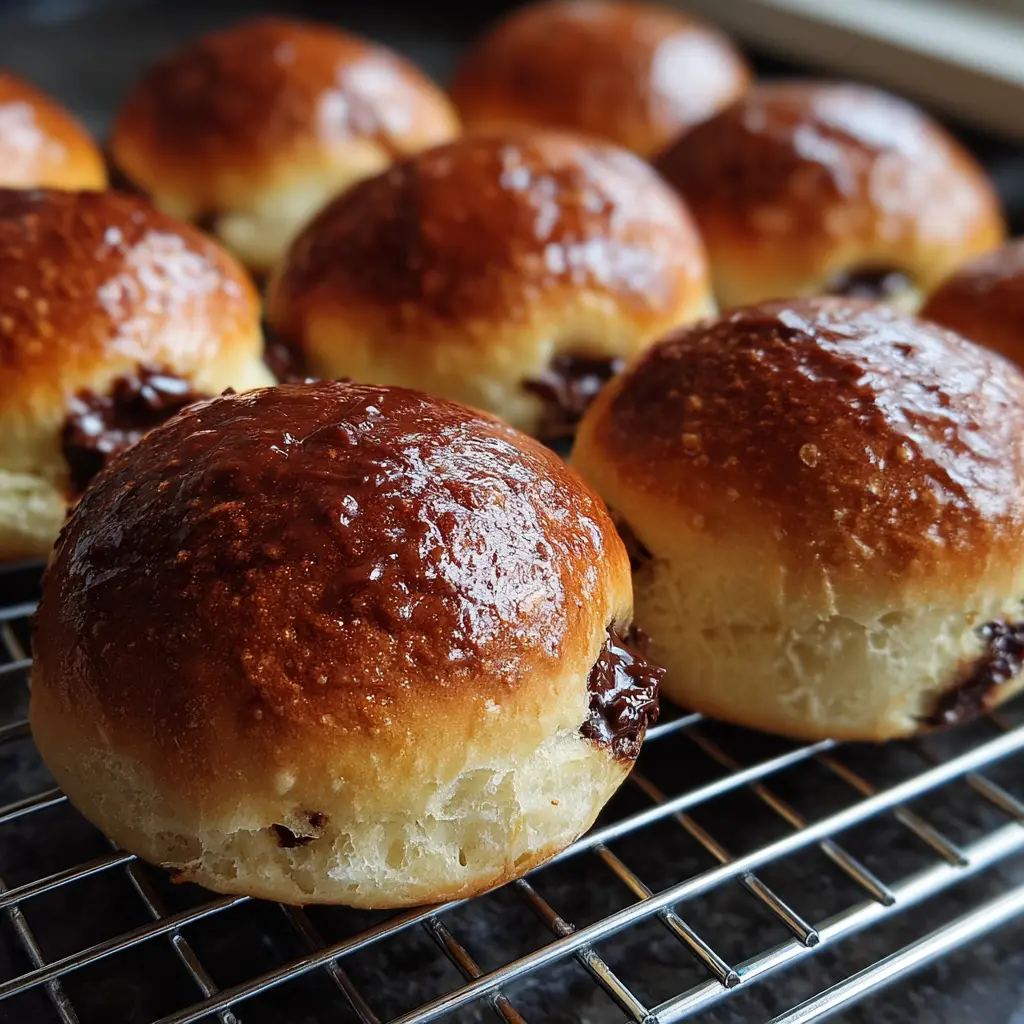
Nothing beats the joy of biting into a soft, fluffy chocolate bun that’s rich in flavor and melts in your mouth. Whether you enjoy them for breakfast, as an afternoon snack, or as a dessert, these homemade chocolate buns are sure to satisfy your sweet cravings.
In this guide, you’ll learn how to make the perfect easy chocolate bun recipe using simple ingredients and step-by-step instructions. You don’t need fancy equipment or professional baking skills—just follow along, and you’ll have bakery-style buns right from your kitchen.
This recipe is ideal for beginners, featuring a simple dough, a rich chocolate filling, and a soft, pillowy texture. Whether you prefer your buns topped with a glossy ganache, dusted with powdered sugar, or stuffed with Nutella, this article will cover all the best variations.
What you’ll learn in this article:
The essential ingredients and substitutes for the perfect chocolate bun
A foolproof step-by-step process for making and baking the buns
The best frostings and toppings for a delightful finish
Storage, reheating, and serving tips for ultimate freshness
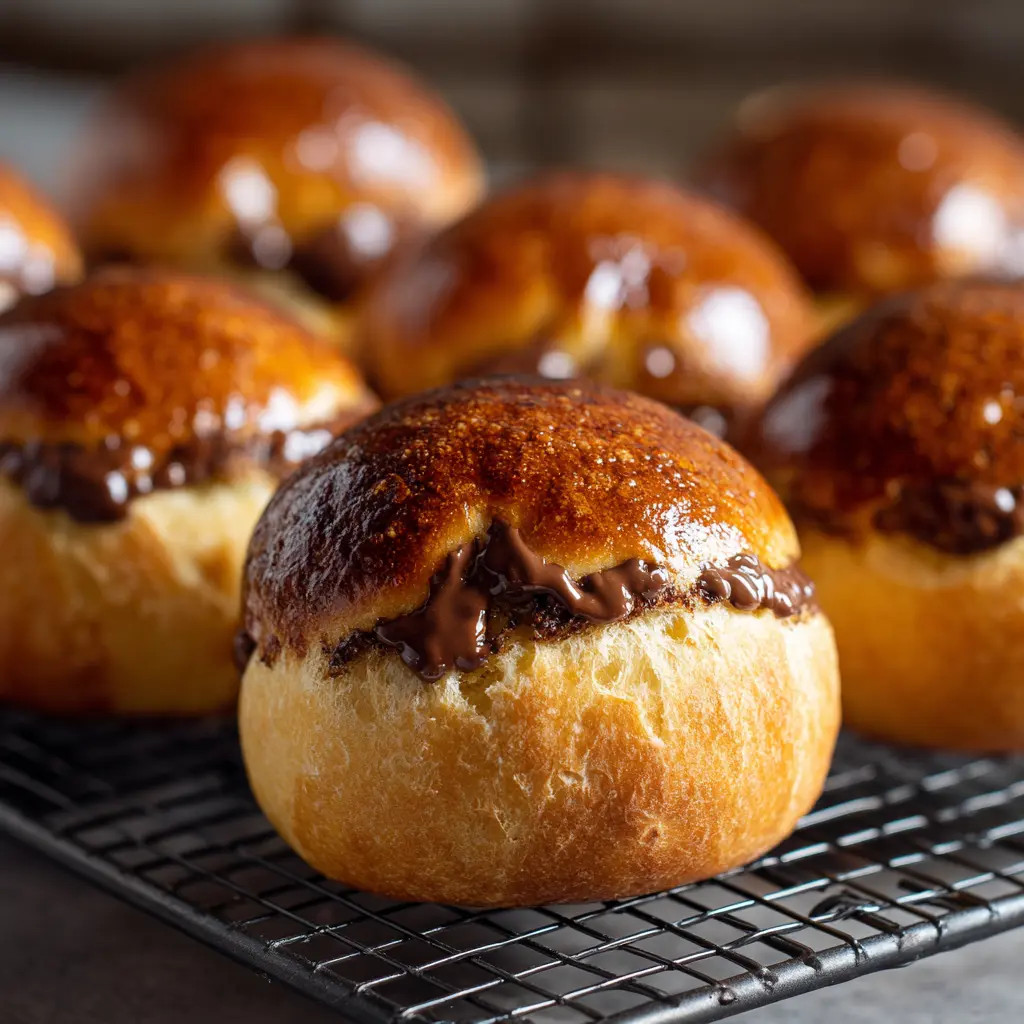
Soft & Fluffy Chocolate Buns Recipe
Ingredients
Equipment
Method
- Step 1: Activate the Yeast
- In a small bowl, mix warm milk, sugar, and yeast.
- Let it sit for 5-10 minutes until frothy.
- Step 2: Make the Dough
- In a large bowl, whisk together flour, cocoa powder, and salt.
- Add the activated yeast mixture, egg, butter, and vanilla.
- Mix until a sticky dough forms.
- Step 3: Knead the Dough
- Transfer the dough to a floured surface and knead for 8-10 minutes until smooth and elastic.
- If too sticky, add a little flour.
- If too dry, add a teaspoon of milk.
- Step 4: First Proofing
- Place the dough in a greased bowl, cover with a damp cloth, and let it rise for 1-2 hours until doubled in size.
- Step 5: Shape the Buns
- Punch down the dough and divide it into 12-15 equal portions.
- Roll each piece into a smooth ball and place on a lined baking tray.
- (For stuffed buns) Flatten each ball slightly, add Nutella/caramel/peanut butter, and seal tightly.
- Step 6: Second Proofing
- Cover the shaped buns and let them rise for another 30 minutes.
- Step 7: Bake to Perfection
- Preheat the oven to 350°F (175°C).
- Brush the buns with egg wash for a shiny crust (optional).
- Bake for 18-22 minutes until set.
- Step 8: Add Toppings
- Let the buns cool slightly before dusting with powdered sugar or drizzling with chocolate ganache.
- Add sprinkles, nuts, or coconut flakes if desired.
Nutrition
Notes
Cool kitchen? Place the dough inside an oven with the light on to help it rise faster.
Want overnight buns? Let the dough proof in the fridge for 8-12 hours for a deeper flavor.
Avoid Overbaking: Bake until the buns are just set and slightly firm. Overbaking will make them dry. Tap the top—if it sounds hollow, they’re done! Custom Fillings & Toppings: Stuff with Nutella, caramel, or peanut butter for a surprise center.
Drizzle with chocolate ganache or glaze for extra decadence.
Sprinkle with chopped nuts, cocoa powder, or toasted coconut for a gourmet touch.
Storage & Reheating: Store at room temperature for 2-3 days in an airtight container.
Freeze baked buns for up to 3 months.
Reheat in the oven at 300°F (150°C) for 5 minutes or in the microwave for 15 seconds.
Pairing Ideas: Serve with a latte, chai tea, or a glass of milk for a comforting treat.
For a dessert twist, pair with vanilla or hazelnut ice cream.
Tried this recipe?
Let us know how it was!Ingredients Breakdown and Substitutes
The key to making soft and delicious chocolate buns lies in choosing the right ingredients. Below is a breakdown of what you’ll need, along with possible substitutes.
Key Ingredients for Soft and Fluffy Chocolate Buns
| Ingredient | Purpose | Possible Substitutes |
|---|---|---|
| All-Purpose Flour | Provides structure and texture | Bread flour for extra chewiness |
| Cocoa Powder | Adds rich chocolate flavor | Dutch-processed cocoa for deeper color |
| Yeast | Helps the dough rise and become fluffy | Instant yeast for a quicker rise |
| Sugar | Sweetens the dough | Honey or maple syrup for natural sweetness |
| Butter | Adds richness and moisture | Coconut oil for a dairy-free option |
| Milk | Enhances softness | Almond or oat milk for a dairy-free alternative |
| Egg | Adds structure and elasticity | Flaxseed egg for a vegan version |
| Chocolate Chips | Melts into the dough for extra flavor | Chopped dark chocolate for a richer taste |
Best Substitutes for Dietary Preferences
If you have dietary restrictions, here are some alternative ingredient swaps:
- Vegan Option: Replace milk with plant-based milk, butter with coconut oil, and eggs with flax eggs.
- Gluten-Free Option: Use a gluten-free baking flour mix that contains xanthan gum for elasticity.
- Sugar-Free Option: Swap refined sugar for stevia or monk fruit sweetener to make the buns diabetic-friendly.
Don’t miss our Dubai Chocolate Recipe if you’d like to explore another luxurious chocolate variation to use as a drizzle or filling.
Chocolate Choices: Cocoa Powder vs. Melted Chocolate
Depending on the flavor and texture you want, you can use either cocoa powder or melted chocolate in your dough.
| Type | Flavor Profile | Best Used For |
|---|---|---|
| Cocoa Powder | Intense, slightly bitter chocolate taste | Dough and light chocolate buns |
| Melted Chocolate | Rich, creamy, and sweet flavor | Filling and ganache toppings |
| Chocolate Chips | Pockets of melted chocolate | Mix-ins for texture and bursts of flavor |
Step-by-Step Guide to Making Chocolate Buns
Now that we have our ingredients ready, let’s move on to the step-by-step process of making soft, fluffy chocolate buns from scratch.
Preparing the Dough – The Right Mixing and Kneading Technique

Activating yeast the right way
The foundation of any easy chocolate bun recipe lies in how well the yeast activates. Start by warming your milk to 105–115°F (40–46°C)—too cool and the yeast won’t wake up, too hot and you’ll kill it. Stir in sugar and yeast, then let it sit for 5–10 minutes until foamy.
If the mixture stays flat, your yeast is expired or the liquid was the wrong temperature. Swap in a fresh packet before continuing.
According to Iowa State University’s Extension guide on yeast breads, maintaining the right liquid temperature is essential for proper fermentation and for achieving a light, fluffy crumb. Source
Mixing wet and dry ingredients
Whisk together flour, cocoa, and salt in a large bowl. Add the foamy yeast mixture, softened butter, egg, and vanilla. Stir with a sturdy spoon or dough hook until a sticky dough forms.
- If too dry: splash in more warm milk, 1 Tbsp at a time.
- If too wet: sprinkle in 1–2 Tbsp flour.
The dough should cling slightly to your fingers without being soupy.
Kneading for elasticity and softness
Kneading develops gluten, giving your buns structure while trapping gases for that cloud-like texture.
- Knead on a lightly floured counter for 8–10 minutes.
- Use the “windowpane test”: stretch a small piece of dough—if it becomes thin without tearing, it’s ready.
| Kneading Time | Result |
|---|---|
| 4–5 minutes | Shaggy, underdeveloped dough |
| 8–10 minutes | Elastic, smooth, ideal for proofing |
| 15+ minutes | Overworked, tight texture |
Pro tip: If you own a stand mixer, let the dough hook do the work on medium-low speed for 6–7 minutes. Pause occasionally to scrape down the sides.
Proofing the Dough for the Perfect Rise
Why proofing matters in an easy chocolate bun recipe
Proofing is the quiet magic that transforms your dough from heavy to airy. During this resting period, yeast ferments the sugars, producing carbon dioxide bubbles that create volume and softness. Skip or rush this step, and your chocolate buns may end up dense and chewy instead of fluffy and light.
First rise: time, temperature, and tips
- Warm room method (75–80°F / 24–27°C): 1 hour
- Cooler kitchen (65–70°F / 18–21°C): 1.5–2 hours
- Overnight refrigerator method: 8–12 hours (slower but more flavorful)
How to do it:
- Place kneaded dough in a greased bowl.
- Cover with a damp towel or plastic wrap.
- Let it sit until doubled in size.
Check readiness: Gently press the dough with your fingertip. If the dent springs back slowly, it’s ready. If it stays, give it another 10–15 minutes.
Avoiding proofing mistakes
- Overproofing: Dough collapses and bakes flat. Watch for signs—if it’s tripled in size and very sticky, you’ve gone too far.
- Underproofing: Buns won’t expand in the oven. They’ll taste doughy inside.
Government food safety guidelines, like the Hong Kong Centre for Food Safety’s recommendations on safe bun handling, stress that dough and baked buns should not sit too long at room temperature—especially if filled—to prevent bacterial growth. Source
Quick proofing hacks if your kitchen is cold
- Place the covered bowl in an oven with just the light turned on (not heat).
- Set the bowl over a pot of warm water (not boiling) for gentle warmth.
- Use a microwave trick: heat a cup of water for 2 minutes, then place the dough inside the steamy microwave (turned off) to rise.
Baking the Chocolate Buns to Perfection
Now that the buns are shaped and ready, let’s move on to baking them to golden, fluffy perfection. Proper baking technique ensures they turn out soft inside with a slight crust on the outside.
Ideal Oven Temperature and Baking Time
- Preheat the oven to 350°F (175°C) for at least 10 minutes before baking. A well-preheated oven helps the buns rise properly.
- Bake the buns for 18-22 minutes, depending on their size.
| Baking Condition | Temperature | Time |
|---|---|---|
| Standard Oven | 350°F (175°C) | 18-22 min |
| Convection Oven | 325°F (163°C) | 16-18 min |
| Larger Buns | 350°F (175°C) | 22-25 min |
Tips to Achieve Golden, Fluffy, and Moist Buns
Egg Wash for Shine – Before baking, brush the buns with an egg wash (1 egg + 1 tbsp milk) for a golden, glossy finish.
Don’t Overbake – Overbaking will make them dry. Remove them when they are set and slightly firm but still soft in the center.
Check for Doneness – Tap the top of a bun; if it sounds hollow, they’re done!
Crisco Chocolate Chip Cookie – If you love chocolate, these cookies are a must-try!
Common Baking Mistakes to Avoid
| Mistake | What Happens | How to Fix |
|---|---|---|
| Overproofing | Buns collapse in the oven | Proof for the correct time |
| Underbaking | Buns are raw inside | Use a thermometer (190°F/88°C internal temp) |
| Oven Too Hot | Buns burn on the outside but stay raw inside | Lower temp & bake longer |
Best Frosting and Toppings for Chocolate Buns
Now that your chocolate buns are perfectly baked, it’s time to make them even more irresistible with delicious frostings and toppings. Whether you prefer a rich ganache, a simple glaze, or fun sprinkles, there’s an option for everyone!

Choosing the Best Frosting: Ganache, Glaze, or Buttercream?
The type of frosting you choose depends on how rich, creamy, or light you want your buns to be.
| Frosting Type | Texture & Flavor | Best for |
|---|---|---|
| Chocolate Ganache | Rich, glossy, and smooth | Decadent, bakery-style buns |
| Powdered Sugar Glaze | Light, sweet, and slightly translucent | A subtle, sweet finish |
| Chocolate Buttercream | Creamy, airy, and rich | Extra indulgence and sweetness |
How to Make a Quick Chocolate Ganache
Heat ½ cup heavy cream until warm (but not boiling).
Pour over 1 cup chopped dark chocolate and let sit for 2 minutes.
Stir until smooth and glossy, then drizzle over warm buns.
What Are Sprinkles Actually Called? – Fun Topping Ideas
Did you know that sprinkles have different names around the world?
| Type of Sprinkle | Also Known As | Common Use |
|---|---|---|
| Rainbow Sprinkles | Jimmies (USA), Hundreds & Thousands (UK) | Adds colorful fun |
| Chocolate Sprinkles | Hagelslag (Netherlands) | Intense chocolate flavor |
| Sugar Pearls | Dragees | Elegant decoration |
| Cocoa Powder | Dusting | Light chocolatey finish |
For a fun twist, try topping your chocolate buns with:
Chopped nuts (almonds, hazelnuts, or pecans)Toasted coconut flakes for added crunch
Crushed cookies (like Oreos) for texture
How to Decorate Chocolate Buns for Special Occasions
| Occasion | Decoration Idea |
|---|---|
| Christmas | Dust with powdered sugar for a snowy look |
| Birthday | Top with rainbow sprinkles |
| Valentine’s Day | Drizzle with white and dark chocolate |
| Halloween | Use orange and black sprinkles |
Variations and Creative Twists
Chocolate buns are delicious on their own, but you can take them to the next level with fun variations and creative fillings. Whether you love a gooey center or want a healthier alternative, here are some ways to customize your chocolate buns.
Stuffed Chocolate Buns – Nutella, Caramel, or Peanut Butter Filling

Adding a surprise filling inside the buns makes them even more indulgent. Here’s how to do it:
- Flatten each dough ball slightly.
- Add 1-2 teaspoons of your favorite filling.
- Seal the edges tightly to prevent leaks.
- Bake as usual and enjoy a warm, melty center!
| Filling Option | Flavor Profile | Best Pairings |
|---|---|---|
| Nutella | Creamy and chocolatey | Best with powdered sugar dusting |
| Caramel | Sweet and buttery | Great with sea salt topping |
| Peanut Butter | Rich and nutty | Best with dark chocolate drizzle |
How to Make a Healthier Version (Less Sugar, More Fiber)
If you’re looking for a lighter, more nutritious version, try these swaps:
Use whole wheat flour instead of all-purpose flour for more fiber.
Swap honey or maple syrup for refined sugar.
Reduce butter and replace it with Greek yogurt for a lower-fat alternative.
Add dark chocolate (70% or higher) instead of milk chocolate to cut down on sugar.
| Ingredient | Healthy Alternative |
|---|---|
| All-purpose flour | Whole wheat or almond flour |
| Sugar | Honey, maple syrup, or coconut sugar |
| Butter | Coconut oil or Greek yogurt |
| Chocolate chips | Dark chocolate (70% cacao or higher) |
Savory Chocolate Bun Ideas – Is It Possible?
Chocolate is usually sweet, but it can also be paired with savory flavors! If you love experimenting, try these unique twists:
Dark chocolate & sea salt buns – Add a pinch of flaky sea salt on top.
Chocolate and chili buns – Mix in a dash of cayenne pepper for a spicy kick.
Cheese-stuffed chocolate buns – Melted brie or cream cheese pairs surprisingly well with dark chocolate.
Don’t miss our Chocolate Pound Cake Recipe if you’re looking for another rich, chocolatey bake to serve alongside these buns.
Storage, Reheating, and Make-Ahead Tips
To keep your chocolate buns fresh, soft, and delicious, proper storage and reheating techniques are essential. Whether you want to enjoy them throughout the week or prepare them ahead of time, follow these simple guidelines.
How to Store Chocolate Buns Without Drying Them Out
| Storage Method | How Long They Last | Best Practice |
|---|---|---|
| Room Temperature | 2-3 days | Store in an airtight container with a paper towel to absorb moisture. |
| Refrigerator | 5-7 days | Wrap individually in plastic wrap to prevent drying out. |
| Freezer | Up to 3 months | Freeze in a sealed freezer bag, removing as much air as possible. |
The Best Ways to Reheat for a Freshly Baked Taste
| Reheating Method | Temperature | Time | Result |
|---|---|---|---|
| Oven | 300°F (150°C) | 5-7 minutes | Soft and warm, like freshly baked |
| Microwave | Medium power | 15-20 seconds | Quick and warm, but may soften too much |
| Air Fryer | 320°F (160°C) | 3-4 minutes | Crisp exterior, warm and soft inside |
Tip: Wrap buns in foil when reheating in the oven to prevent them from drying out.
Freezing Dough vs. Freezing Baked Buns – What Works Best?
If you want to prepare chocolate buns in advance, freezing is a great option.
| Freezing Option | How to Do It | Best For |
|---|---|---|
| Freezing Dough | Shape dough balls, place on a baking sheet, freeze, then transfer to a bag. | Baking fresh buns later |
| Freezing Baked Buns | Cool completely, wrap tightly in plastic, store in a freezer bag. | Quick reheating and serving |
Pairing Chocolate Buns with Drinks & Other Treats
Chocolate buns taste amazing on their own, but pairing them with the right drink or side treat can enhance their flavor even more. Whether you prefer coffee, tea, or something indulgent, here are the best pairings.
Best Drinks to Serve with Chocolate Buns
| Drink | Why It Works | Best for |
|---|---|---|
| Hot Coffee (Espresso or Latte) | The bitterness of coffee balances the sweetness of chocolate. | Breakfast or afternoon snack |
| Hot Chocolate | Doubles the chocolate experience for extra indulgence. | Cozy winter treat |
| Milk (Regular or Almond) | A classic pairing that enhances the chocolatey taste. | Kids and chocolate lovers |
| Chai Tea or Earl Grey | Spiced teas add warmth and contrast. | A lighter alternative to coffee |
| Red Wine (Merlot, Cabernet) | The bold, fruity flavors complement the chocolate richness. | Elegant dessert pairing |
Chocolate Buns with Ice Cream – The Ultimate Dessert Pairing
For an indulgent dessert, try serving warm chocolate buns with a scoop of vanilla, caramel, or hazelnut ice cream. The warm and cold contrast makes every bite irresistible!
Drizzle with melted chocolate or caramel sauce for extra flavor.
Add crushed nuts or cookie crumbs for added crunch.
How to Create a Brunch Menu Featuring Chocolate Buns
Want to serve chocolate buns at brunch? Pair them with these delicious options for a complete spread:
| Brunch Item | Why It Works |
|---|---|
| Fresh Berries (Strawberries, Raspberries) | The tartness balances the sweetness. |
| Scrambled Eggs | Adds a savory touch to contrast with the chocolate. |
| Greek Yogurt with Honey | A creamy, tangy side that complements chocolate. |
| Almond Croissants | Another rich pastry that pairs well with coffee. |
(FAQs)
What type of frosting is best for cupcakes?
The best frosting for cupcakes depends on the texture and sweetness you prefer. Buttercream is the most popular choice because it’s light, creamy, and easy to work with. If you prefer a richer topping, ganache is a great option, especially for chocolate lovers. For a tangy twist, cream cheese frosting works well, particularly for red velvet or carrot cupcakes. If you want something light and airy, whipped cream frosting is a fantastic choice, though it doesn’t hold up well in warm temperatures.
What type of frosting is better for cupcakes?
If you’re looking for a stable, pipeable frosting, buttercream is the best option. It’s smooth, holds its shape well, and can be flavored in many ways. If you prefer a glossy finish with intense chocolate flavor, ganache is ideal. Whipped frosting is better for those who like a lighter, less sweet topping, while cream cheese frosting adds a slight tang that balances sweetness.
What are sprinkles actually called?
Sprinkles have different names depending on the region. In the U.S., they are commonly called “jimmies” when referring to chocolate sprinkles and “nonpareils” for tiny round sugar beads. In the UK and Australia, they are often called “hundreds and thousands.” Dutch chocolate sprinkles are known as “hagelslag.” There are also sugar pearls, confetti sprinkles, and rod-shaped sprinkles used for cake and dessert decorations.
Best type of frosting for chocolate cake?
For a rich, moist chocolate cake, the best frosting options are chocolate ganache, whipped chocolate buttercream, or chocolate fudge frosting. Ganache is silky and smooth, giving a glossy finish. Whipped chocolate buttercream is light yet rich, making it perfect for layering. Fudge frosting is a thicker, creamier option for those who love an indulgent, deep chocolate flavor. If you want a tangy contrast, chocolate cream cheese frosting is also an excellent choice.
Conclusion
Making homemade chocolate buns is easier than you think! With the right ingredients, kneading techniques, and baking tips, you can create soft, fluffy buns with a rich chocolate flavor. Whether you enjoy them plain, stuffed with Nutella, or topped with a glossy ganache, these buns are guaranteed to satisfy any sweet craving.
Follow the proofing and baking tips to ensure a light, airy texture.
Experiment with different fillings and toppings to customize your buns.
Store them properly to keep them fresh for days.
Looking for inspiration? Try topping your buns with Chocolate Whipped Cream for a light, creamy finish once they cool.
Try this easy chocolate bun recipe today and enjoy bakery-style buns at home! Don’t forget to pair them with a warm drink or ice cream for the ultimate treat.